Photoshop����ë����ʥ�Q��(ji��)���w��Ӣ��(11)
����Դ�� Tutsplus.com�����x���� Rose �o�҂�������(j��ng)���ʵ����£�13. How to Add Finishing Touches
Step 1
Add a Hue/Saturation adjustment layer and clip it to the Background Image layer.
Choose the Yellows channel, and change the Saturation value to -25.

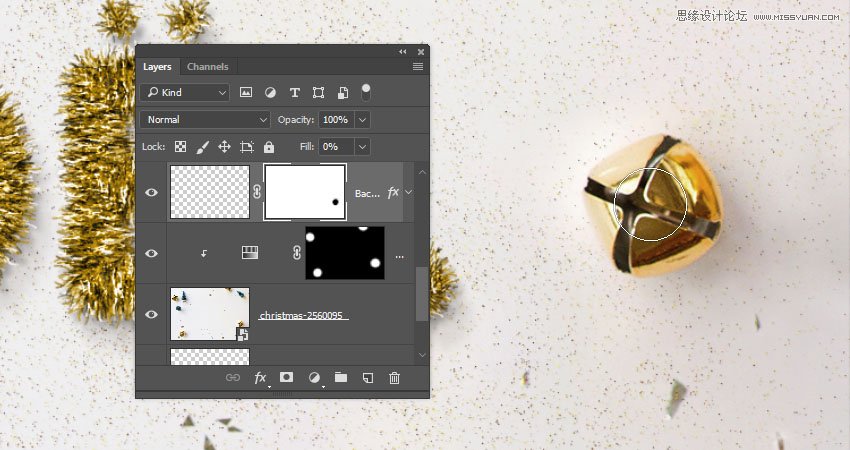
Step 2
We need the Hue/Saturation layer to affect only the bells in the image.
So fill the Hue/Saturation layer mask with Black, set the Foreground Color to White, and use a soft round brush tip to brush over the bells.
Advertisement
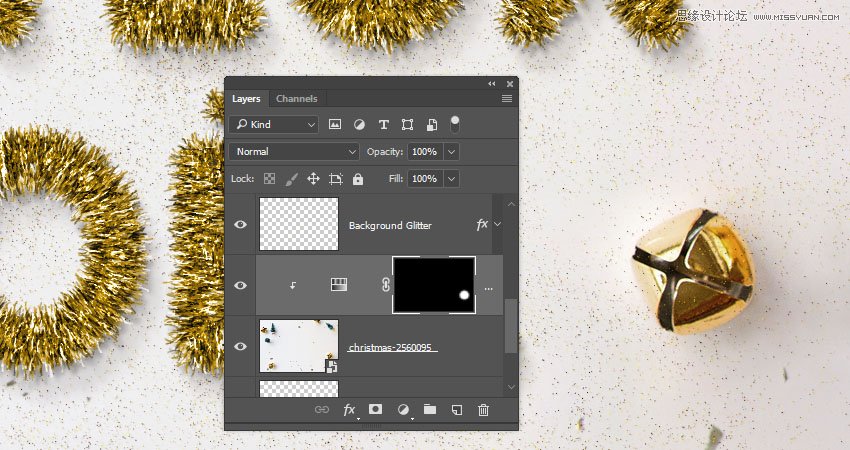
Step 3
Select the Background Glitter layer and click the Add layer mask icon at the bottom of the Layers panel.
Set the Foreground Color to Black, and paint over the areas you want to remove the glitter from, like the bells and the trees, since the glitter is supposed to be under them.
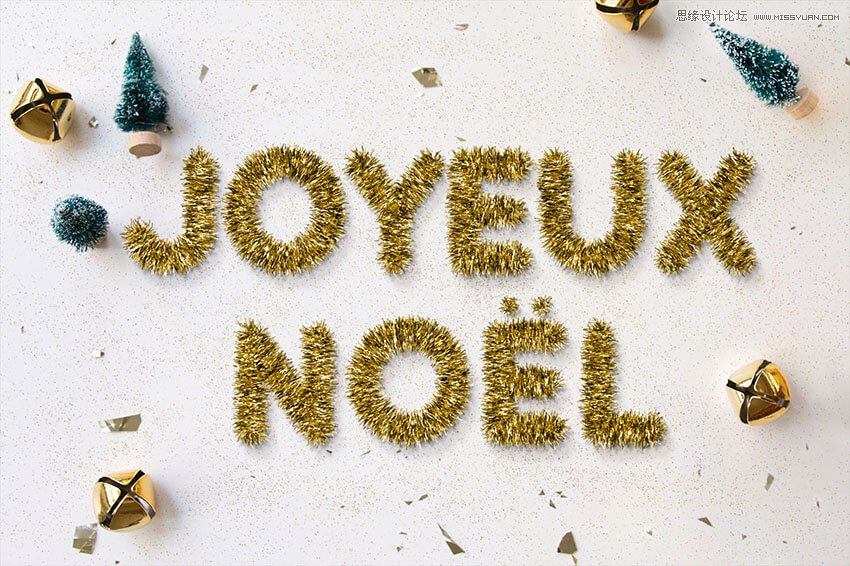
Congratulations! You're Done
In this tutorial, we created a simple brush tip and adjusted its settings to create the main tinsel effect.
Then, we styled the many layers used in creating the effect to achieve the final result. After that, we added glitter, modified the background image, and added global adjustments to the effect.
Finally, we used some more adjustment layers and layer masks to add final touches.
Please feel free to leave your comments, suggestions, and outcomes below.
 ���㲻Ҫ��
-
 Photoshop������(f��)���L(f��ng)�������ƬЧ����Ӣ��2018-04-23
-
 Photoshop�ϳ��L����(chu��ng)������L�i¹��Ӣ��2018-04-23
-
 Photoshop�ϳɱ�����Ч�Ľ��~������Ӣ��2018-02-10
-
 Photoshop�ϳɉ�(m��ng)���L(f��ng)���ɭ�ֈ�����Ӣ��2018-02-10
-
 Photoshop�ϳ�����ʩ��������Ӣ��2018-02-10
-
 Photoshop���������|(zh��)�е�3D���w�֡�Ӣ��2018-01-09
-
 Photoshop�O(sh��)Ӌ(j��)����ȼ��ˇ�g(sh��)�ֽ̡̳�Ӣ��2018-01-09
-
Photoshop������(f��)���L(f��ng)�������ƬЧ����Ӣ��
���P(gu��n)����11882018-04-23
-
 Photoshop�����S���|(zh��)�����w�֡�Ӣ��
���P(gu��n)����7422018-02-10
Photoshop�����S���|(zh��)�����w�֡�Ӣ��
���P(gu��n)����7422018-02-10
-
 Photoshop�����@�G����3D���w��
���P(gu��n)����14682018-02-10
Photoshop�����@�G����3D���w��
���P(gu��n)����14682018-02-10
-
 Photoshop������(f��)���p���ع����w
���P(gu��n)����6532018-01-09
Photoshop������(f��)���p���ع����w
���P(gu��n)����6532018-01-09
-
 Photoshop����ľ�ذ�LOGO��ӡЧ����Ӣ��
���P(gu��n)����19272018-01-09
Photoshop����ľ�ذ�LOGO��ӡЧ����Ӣ��
���P(gu��n)����19272018-01-09
-
Photoshop���������|(zh��)�е�3D���w�֡�Ӣ��
���P(gu��n)����4612018-01-09
-
Photoshop�O(sh��)Ӌ(j��)����ȼ��ˇ�g(sh��)�ֽ̡̳�Ӣ��
���P(gu��n)����7612018-01-09
-
 Photoshop������(f��)�Ż���M�ɵ�ˇ�g(sh��)�֡�Ӣ��
���P(gu��n)����3802018-01-09
Photoshop������(f��)�Ż���M�ɵ�ˇ�g(sh��)�֡�Ӣ��
���P(gu��n)����3802018-01-09
